DIY Bookish Crafts: From Bookmarks to Home Décor
- Abbey Smith

- Dec 11, 2025
- 12 min read
Ever wonder what happens when creativity meets your bookshelf? Discover how to turn ordinary books into extraordinary art—from simple bookmarks to statement décor pieces that tell your story. Ready to refresh your reading space? These bookish crafts combine literary passion with hands-on creativity (no fancy art degree required).
Nothing says "holiday magic" quite like turning a book into a Christmas tree. That's precisely what happened at the recent "Create a Tree from Books" workshop at Chelsea Public Library, where participants gathered to fold, shape, and turn ordinary hardcover books into stunning festive décor. Watching those pages come alive as festive trees was a reminder that books aren't just for reading. They're for crafting stories in every sense of the word.
This workshop was more than just a craft session; it was a celebration of creativity, community, and the joy of giving old books new life. The visual arts have always found inspiration in literature, and these bookish crafts represent that beautiful intersection where reading meets making.
When you fold a book page into a flower or frame a favorite quote, you're participating in a creative tradition that honors both the written word and the tactile pleasure of working with your hands.
Here's the thing: crafting with books connects you to centuries of artistic practice. Culture has long celebrated the book as both vessel and medium, from medieval illuminated manuscripts to contemporary book sculptures.
The arts recognize books as more than just information containers. They're raw materials for expression, transformation, and beauty. This cultural appreciation spans generations and geographic boundaries, with different traditions bringing unique approaches to paper crafting and book art.
Think about Japanese origami masters who elevated paper folding to spiritual practice, or European artisans who created elaborate pop-up books in the Victorian era. You're joining that lineage every time you pick up scissors and reimagine what a book can become.
Plus, these projects let you rescue damaged books that might otherwise end up in landfills, giving them a second life as functional art. It's sustainability meets creativity—and your bookshelf will thank you for it.
So, grab your scissors and glue (and bandages if you’re anything like I am), and let's get started on crafting your own literary masterpieces.
Why Try Bookish Crafts?
Crafting with books and pages isn't just about making pretty things. It's a way to connect more deeply with the stories we love, to give new life to old or damaged books, and to create thoughtful gifts or home décor that reflect your passion for reading. And every time you see that book page garland hanging in your reading nook, you're reminded of the narratives that shaped you.
But here's what makes bookish crafts particularly special: they bridge the gap between passive consumption and active creation. When you're folding pages or cutting shapes, you're engaging with literature in a completely different way. You're not just absorbing someone else's story—you're creating your own visual narrative.
This embodied learning approach, where you physically interact with materials, creates lasting memories and positive associations that enhance your overall relationship with books. And research consistently shows that hands-on experiences generate deeper neural connections than passive observation alone (which is why your kids remember the craft projects from school but forget the lectures).
Luckily, these projects are affordable, accessible, and a wonderful way to spend quality time with family or friends. You don't need fancy art supplies or expensive materials. Just use your imagination and be willing to experiment. The barrier to entry is refreshingly low, making visual arts accessible to anyone who can wield scissors and has a glue stick handy.
What You'll Need
Most bookish crafts require just a few basic supplies:
Scissors and craft knives
Glue (white glue, glue sticks, or Mod Podge)
Ruler and pencil
Hole punch
Ribbon, string, or yarn
Old books (from our monthly used books sales, thrift stores, or damaged copies)
Optional: pressed flowers, cardstock, paintbrushes, decorative papers
If you're hesitant to cut into your favorite books, consider using photocopies of pages or printable vintage book pages instead. And here's a pro tip: when sourcing materials for your projects, focus on quality over quantity.
Books in excellent condition generate significantly more revenue per item, whether you're buying them at library sales for crafting or selecting which volumes to turn into art pieces. Save the pristine hardcovers for donation and grab the water-damaged novels and outdated encyclopedias for your craft table instead.
Project 1: Custom Bookmarks
Bookmarks are a classic and easy way to add a personal touch to your reading experience. They're also perfect first projects if you're new to bookish crafts (i.e., low commitment, high reward).
Tassel Bookmark
This bookmark is simple, practical, and makes a lovely gift. And the tassel adds movement and elegance. Every time you open your book, it's a little moment of beauty.

Tassel Bookmark 1 Instructions:
Cut cardstock into a 2" x 6" rectangle.
Decorate with favorite quotes, illustrations, or a collage of book pages. (Don't be shy about pulling quotes from novels that moved you.)
Punch a hole near the top center.
Apply 1-2 coats of Mod Podge to seal and protect.
Attach a tassel made from embroidery floss or ribbon through the hole.
Let dry completely before use.
Tassel Bookmark 2 Instructions:
Carefully cut the spine from an old book and clean up the edges.
Punch a hole at the top and insert a tassel or ribbon.
Apply 1-2 coats of Mod Podge (optional)
Helpful Hints:
Check out this tutorial from Crafts a la Mode.
Use a ruler to ensure straight cuts.
Allow Mod Podge to dry fully to avoid smudging.
Personalize with waterproof pens or markers for durability.
Try using graphic novels or comics for a pop of color.
Corner Bookmarks
These slip right onto the corner of your page, so no more losing your place or damaging fragile book spines that might not work well with traditional bookmarks.
The best part? You can decorate these as animals, monsters, or characters.
Try creating a set themed around a specific book, with each bookmark representing a different character. It's a fun way to extend the story beyond the pages and practice your visual arts skills on a forgiving, low-stakes project.
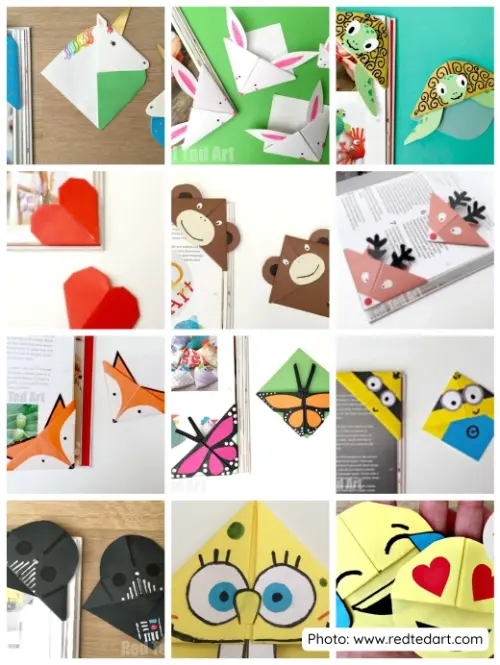
Corner Bookmarks Instructions:
Cut a 5" x 5" square of paper.
Follow simple origami steps to create the pocket. (Check out this tutorial from Red Ted Art, which includes tons of fun ideas and templates.)
Decorate as desired with colors or character designs.
Helpful Hints:
Use lightweight paper for easier folding.
Practice folds on scrap paper before finalizing.
Avoid over-decorating to maintain flexibility.
Pressed Flower Bookmarks
This project beautifully combines the natural world with the literary one (i.e., visual arts at their most accessible and charming).
And pressing flowers is easier than you might think. Just place fresh blooms between book pages (use books you don't mind slightly dampening), weigh them down, and wait about two weeks. The result is preserved beauty you can incorporate into your crafts.

Pressed Flower Bookmarks Instructions:
Press flowers between book pages for about two weeks.
Arrange pressed flowers on cardstock with quotes.
Cover with clear contact paper or laminate.
Punch a hole and add a ribbon.
Helpful Hints:
Use fresh, flat flowers for best results.
Handle pressed flowers gently to avoid breakage.
Laminate to protect against wear and moisture.
Project 2: Book Page Art
Turn pages from old books into beautiful art pieces for your home. This is where bookish crafts really start to shine as legitimate visual arts. You're not just making functional items anymore—you're creating gallery-worthy pieces that express your personal aesthetic and literary taste.
Framed Quotes
This simple project creates a lovely reminder of your favorite stories. Hang several together in a gallery wall arrangement, mixing different book pages, fonts, and frame styles for visual interest.
The arts have long recognized the power of typography as design element—your framed quotes honor that tradition while personalizing your space.

Framed Quotes Instructions:
Select a meaningful quote and carefully cut it out.
For a vintage look, age the paper with cooled tea or coffee. The tannins create that gorgeous sepia tone that makes text look like it's been treasured for generations.
Attach the quote to cardstock.
Add decorative elements such as photos or pressed flowers.
Frame and hang.
Helpful Hints:
Check out this tutorial from Jennifer Rizzo.
Use acid-free cardstock to prevent yellowing.
Test tea/coffee aging on a scrap page first.
Use a clean brush for even application of stain.
3D Paper Flowers
These paper flowers make charming bouquets that never wilt. And the printed text on the petals adds unexpected depth and texture. Try creating flowers from pages of a romance novel for an anniversary gift, or use children's book pages for a nursery decoration.
The narrative context adds layers of meaning to your visual arts project. Culture has always used flowers as symbols—roses for love, lilies for purity—and when you craft them from specific literary passages, you're creating a double-layered message that speaks to both the eye and the intellect.

3D Paper Flowers Instructions:
Cut circles of varying sizes from book pages. (Check this tutorial from Artsy Cupcake)
Fold and shape each circle into petals.
Stack petals and secure with floral wire.
Arrange into bouquets or single stems.
Helpful Hints:
Use thicker pages for sturdier petals.
Experiment with petal shapes for variety.
Secure wire ends safely to avoid injury.
Book Page Garland
If you've been to one of our book sales, you might have seen our book page garland hanging from the tables. Not only is this a great way to use old books, but it's a fun, easy project for all ages.
Hang your garland on a bookshelf or mantel for a literary touch that turns any space into a reader's haven. For extra dimension, fold each shape slightly in the middle before stringing—this creates shadows and movement that make the garland feel more dynamic. It's amazing how such a simple technique elevates the entire piece from flat decoration to dimensional art installation.

Book Page Garland Instructions:
Cut book pages into shapes (hearts, stars, pennants).
Optionally decorate (we used watercolors).
Fold shapes slightly in the middle for dimension.
String shapes on twine and hang.
Helpful Hints:
Use lightweight paper for easy hanging.
Space shapes evenly for a balanced look.
Reinforce holes with tape if paper is fragile.
Creative Statement Pieces: Turn Your Books into Bold Décor
For those ready to take on a bigger project, these ideas turn books into statement pieces that anchor entire rooms. We're talking about bold, conversation-starting décor that announces your love of literature the moment someone walks through your door.
DIY Secret Storage Book Box
For a functional and stylish twist on book crafts, try creating a secret storage book box. This clever project transforms a stack of books into a hidden compartment perfect for storing small items while adding literary charm to your space.
This project combines the aesthetic appeal of books with practical storage, making it a perfect conversation piece and a clever way to keep your space organized.

Secret Storage Book Box Instructions:
Select a stack of hardcover books of similar size and thickness.
Carefully hollow out the pages of the top book to create a cavity, leaving a sturdy border around the edges.
Use strong adhesive to glue the books together securely, stacking them neatly.
Line the hollowed-out cavity with decorative paper or fabric for a polished look.
Optionally, add a magnetic closure or ribbon to keep the box closed.
Place the secret storage box on a shelf or table to blend seamlessly with your décor while keeping your valuables discreetly hidden
Helpful Hints:
Choose hardcover books with sturdy covers for better durability.
Use a sharp craft knife and work slowly to hollow out pages cleanly.
Apply glue evenly to avoid lumps and ensure a strong bond between books.
Line the cavity with fabric or decorative paper to protect stored items and add a polished finish.
Consider adding a magnetic closure or ribbon for easy opening and secure closing.
Work on a protected surface and wear gloves to avoid paper cuts.
For detailed step-by-step instructions and visuals, check out the tutorial at House of Mahalo: DIY Secret Storage Book Box.
Altered Book Sculpture
Remember that Christmas tree project I mentioned at the beginning of this post? You can make more than trees. In fact, you can fold the pages of a thick book in patterns to create three-dimensional sculptures including hearts, words, and geometric patterns. This technique—sometimes called book folding or book origami—can produce intricate shapes and designs that make fascinating conversation pieces.
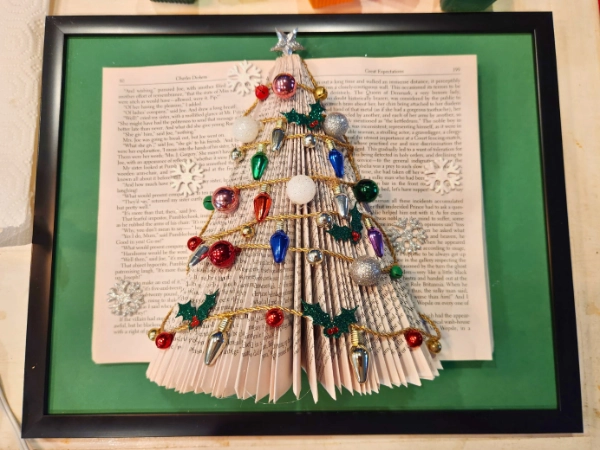

The key is precision and patience. Each fold matters, and the cumulative effect of hundreds of carefully angled pages creates stunning visual arts pieces that seem to defy the book's original purpose. You might be excused for thinking these sculptures are impossibly complex, but with practice and good tutorials, they're absolutely achievable. The arts have always valued mastery through repetition—this is your chance to experience that meditative practice firsthand.
Altered Book Sculpture Instructions:
Choose a thick hardcover book.
Fold pages precisely according to a pattern or tutorial (check out these tutorial videos).
Continue folding each page to form the desired shape.
Display as a standalone sculpture or centerpiece.
Helpful Hints:
Work in a well-lit area for accuracy.
Use a bone folder or similar tool for crisp folds.
Be patient; intricate designs take time.
Book Planter
This project brilliantly illustrates how books can nurture growth, both intellectual and literal. Plus, it's a clever solution for adding plants to small spaces where traditional pots might not fit.

Book Planter Instructions:
Carefully cut a cavity into the pages of a hardcover book or a stack of books.
Seal edges with Mod Podge or white glue.
Insert a plastic liner to protect pages.
Fill with soil and plant a small succulent or plant.
Helpful Hints:
Check out this helpful tutorial from Insteading.
Choose plants with low water needs.
Avoid overwatering to protect the book.
Use waterproof liners for longevity.
What Makes the Perfect Book for Crafting?
Not all books are created equal when it comes to crafting projects. Here's what to look for when selecting your materials:
Hardcover books work best for structural projects like planters and sculptures. The rigid covers provide stability and the pages are typically thicker, which means they hold folds and shapes better. Culture has long associated hardcover books with permanence and quality—traits that translate beautifully into craft projects that need to withstand handling and display.
Damaged or outdated books are ideal candidates (think encyclopedias from the 1980s, textbooks with outdated information, or novels with water damage that make them unreadable). You're giving these books a second life rather than sending them to landfills. When considering donations versus crafting, remember that donation limits typically recommend 1-2 boxes per visit for efficient processing, so damaged books are better suited for your craft table. Libraries and book sales can't sell moldy, torn, or heavily damaged books anyway—you're actually doing them a favor by repurposing these materials instead of adding to their disposal burden.
Font and page quality matter for visible text projects. Victorian-era reproductions or books with interesting typography add character to bookmarks and framed quotes. The visual appeal of the text itself becomes part of your arts and crafts statement. Look for serif fonts, decorative chapter headings, and illustrated capitals—these design elements were standard in older books and add instant vintage charm to modern projects.
Bringing Your Bookish Crafts to Life
Whether you're making a simple bookmark or a complex sculpture, bookish crafts are a wonderful way to celebrate reading in a hands-on way. They're perfect for gifts, home décor, or just a relaxing creative activity that lets you slow down and create something meaningful with your hands.
The beauty of these projects is their flexibility. Start with a basic bookmark and work your way up to more ambitious pieces as your confidence grows. There's no pressure to be perfect. In fact, some of the most charming bookish crafts have that handmade, slightly imperfect quality that makes them feel authentic and personal.
The arts have increasingly embraced the wabi-sabi philosophy—finding beauty in imperfection—and your slightly crooked bookmark or asymmetrical paper flower embodies that perfectly.
And here's something to consider: these crafts make incredible gifts for fellow book lovers. A framed quote from someone's favorite novel shows thoughtfulness that a store-bought item simply can't match. You're giving them a piece of art that speaks directly to their literary soul.
Plus, handmade gifts carry emotional weight that manufactured products never achieve. You've invested your time, creativity, and attention into something specifically for them.
Ready to start crafting? Join us at the next Friends of Chelsea Library book sale to stock up on affordable materials, or check out the library's craft book collection for more inspiration and techniques.
Related Resources
Explore the Chelsea Public Library's collection of craft books. They have an entire section dedicated to paper crafts, upcycling, and visual arts techniques that can take your bookish projects to the next level.
Attend upcoming Friends of Chelsea Library book sales for crafting materials, where you'll find affordable books perfect for projects. The sales typically feature books at rock-bottom prices—exactly what you need for guilt-free crafting.
Learn more about donating books responsibly with our Book Donation Guide so you can understand what makes books suitable for donation versus crafting.
Follow our blog for more creative ideas that blend literature with hands-on experiences that create lasting memories.
Happy Crafting and Happy Reading!
Remember, every project you create is a celebration of the stories that have shaped your life, and a testament to the enduring power of books to inspire and bring beauty into our everyday spaces.
We'd love to see what you create! Share your bookish crafts on social media and tag the Friends of Chelsea Public Library. Your projects might inspire others to pick up a book—and some scissors!
Friends of Chelsea Library is a non-profit organization dedicated to supporting the Chelsea Public Library through fundraising, advocacy, and volunteer service. 100% of proceeds from our book sales directly benefit library programs and resources that serve our community.


Comments